
创建正射影像
打开文件 FrontageOrthoImage.3dr(下载)。
启动 Extract OrthoImage 命令,并为 OrthoImage mode 选择 Elevation view。
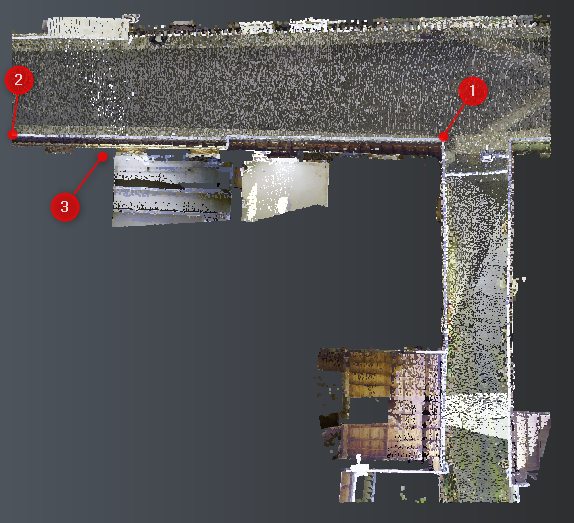
按下图所述给出 3 个点,以定义要映射的立面(确保工具栏中已启用 XYZ 模式)。这 3 个点可以在轨道正交相机模式下准确单击,也可以通过坐标给出。
现在,你可以调整所定义的框,以精确捕获所需内容。这可以通过在场景中编辑 limit box(在 3D frame 视图中)来实现,也可以通过对话框编辑 size、depth 和 top left corner 来实现。为保持正射影像中的水平线仍为水平,建议不要修改 Horizontal 参数。
你可以启用 Preview 以实时查看更改。
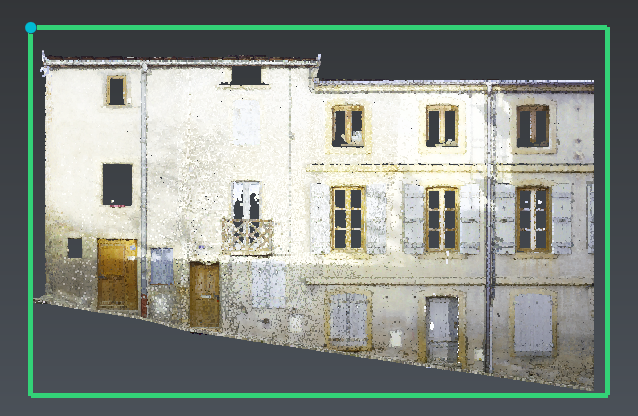
按如下所示设置图像属性参数:
- Pixel size:0.01 m,
- Point/Line magnification: 1,
- Background color:白色。
然后 Save image 为图片文件。在 Select the destination file... 对话框中,输入 orthoimage 作为文件名,并选择 jpeg 作为文件格式。
已创建两个文件:
- orthoimage.jpg:图片
- orthoimage.txt:地理配准文件
在 AutoCAD 中插入影像
警告
选择逆时针方向,并将 Decimal Degrees 或 Radians 以及 Meters 作为图形单位(在命令行提示中键入 UNITS,或从 Format 菜单中启动 Units)。
使用文本编辑器(如 Notepad)打开 orthoimage.txt,并用 AutoCAD 打开一个空文件。
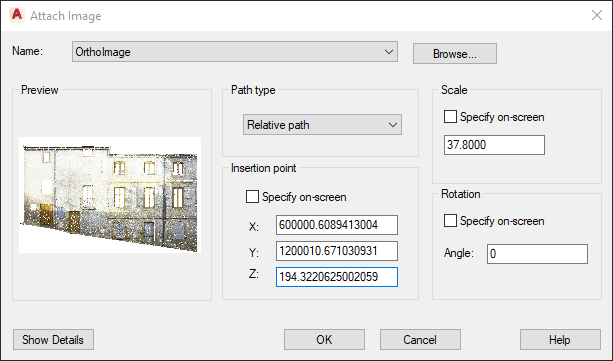
在 AutoCAD 中,于命令行提示处输入 IMAGEATTACH,然后选择 orthoimage.jpg
提示与技巧
你也可以从 Insert... 菜单或 Ribbon 中添加 Raster Image Reference...。
- 按如下所示取消勾选所有选项。
- 然后将 orthoimage.txt 中的插入点复制粘贴(参见 Autocad import 一节)到 Insertion point 组。
- 对 Scale 执行相同操作,并将 Rotation 设置为 0。
- 用 OK 确认。
在 AutoCAD 中旋转影像
现在,需要旋转该影像。
警告
如果需要多次旋转,请记住沿某一轴进行第一次旋转会改变另外两个轴。
如果 rotation Z 不为 0,
- 在命令行中输入 ROTATE3D,
- 选择影像,
- 选择 Z 轴方向,
- 在影像对象中选择左下角,并复制粘贴 rotation Z。
接着,如果 rotation X 不为 0,
- 在命令行中输入 ROTATE3D,
- 选择影像,
- 使用影像对象的左下点和右下点定义旋转轴(X' 轴)
- 复制粘贴 rotation X。
最后,如果 rotation Y 不为 0,
- 在命令行中输入 ROTATE3D,
- 选择影像,
- 使用影像对象的左下点和左上点定义旋转轴(Y" 轴)
- 复制粘贴 rotation Y。
命令行提示
Bash
Command: ROTATE3D
Current positive angle: ANGDIR=counterclockwise ANGBASE=0
Select objects: 1 found
Specify first point on axis or define axis by
[Object/Last/View/Xaxis/Yaxis/Zaxis/2points]: z
Specify a point on the Z axis <0,0,0>:
Specify rotation angle or [Reference]: 179.2574996998036

Command: ROTATE3D
Current positive angle: ANGDIR=counterclockwise ANGBASE=0
Select objects: 1 found
Specify first point on axis or define axis by
[Object/Last/View/Xaxis/Yaxis/Zaxis/2points]: Specify second point on axis:
Specify rotation angle or [Reference]: 90
现在,OrthoImage 已以 3D 形式插入到 AutoCAD 场景中。